Saturday, 19 November 2016

Another Battletech battle report!

Hello again, and welcome back to the dark ages! It’s time for another Battletech battle report!

This time around, we're not playing solo - I've roped my brother into leading his own half-lance against me over Skype for his first game. Time to get some attention against another human being and see how that changes up gameplay.

He generated his own characters, and I rolled up a very average pilot for my Panther while using the same stats as last time for myself. Unfortunately, I don't have them written down here, so I can't tell you exactly what they were.
As for ‘Mechs, we went with 1 assault and 1 light, to let me use my current favourite, the Cyclops, while he got to pilot his own favourite ‘Mech from our days playing the computer games, the Atlas! Besides that, his Light was a Jenner, a fairly solid choice as far as I know, and I picked the Panther, who turned out to be MVP for the skirmish! You'll see why soon enough, haha.


The game begins with our 2 ‘Mech lances squaring off across basically a single line of woods. While I don't want to close up and brawl with his Atlas, I also don't want to be in its front arcs any longer than I need to, so I push out my Lance to try flanking right around.


My brother's Jenner does a decent job of getting in the way with its frankly remarkable speed, and we start firing while all clustered together. In the first volley, the highlights are the Panther unleashing a bolt from his PPC straight into the Atlas’ head and taking a volley of LRMS to the torso in return. What a shot! The armour is fully stripped from the Atlas’ head now, its weakest part. Good thing for them that that was one in a million...


The little clusterf**k continues, as I keep trying to turn the Atlas’ flank. Relatively little damage is done, but with all the Alpha strikes being tossed at close range, we're getting a rude introduction to the heat management rules!


In an unfortunate turn of events, the left arm is blown clean off my Cyclops. However, it had done it's job - the Atlas was turned, and the Panther took its chance to fire again. H-h-headshot! The Atlas, basically undamaged except for the two (!) PPC bolts to the head, collapses into a heap! What a show by the Panther! But it doesn't end there. In the same turn, the Jenner charged the Panther to get some melee in and maybe knock it down. Little did he know that the pilot of the plucky blue ‘Mech was able to both snipe an assault and dodge the charge simultaneously!


In a desperate attempt to regain control of the situation, the Jenner attempts to kick the Panther. This is a success, but it's pilot keeps it upright, and the return fire from both my ‘Mechs knocks off one arm and one leg. The Jenner’s pilot then makes the probably smart decision to eject after hitting the ground.


Wow! Well let it never be said that Lights can't do some good work if you let them! Of course, the Panther is something of an exception with the big old PPC… of course, if he hadn't hit his targets with such aplomb, I'm sure I would have been lamenting bringing along such a one-trick-pony. That being said, if it weren't for those shots, I'm not sure how I would've taken the hulking Atlas down.


Of course, we both still need more practice, but I'm sure there'll be plenty more opportunities to get some in the future. Fingers crossed, if I just pick up a paintbrush again before then, I may even get to pilot my favourite ‘Mech from the fluff! I've read it's not the best choice in tabletop, but I've never been one for the meta of any game - it's a game for fun, after all. And besides, in the end, I'd rather be the prettiest corpse on the battlefield!

Thanks for reading, and see you all next time!

Tuesday, 11 October 2016

Battletech intro and practice!

Hello again, and welcome back to the Dark Ages! 

Two exciting new things in today's post:

First, I am posting from my phone, a new Samsung Galaxy something neo. It's a pretty drastic technological improvement over my blackberry (it can access this site to post things, for one example), but autocorrect is a huge pain, so I expect some mistakes (not to mention format errors) to sneak into the first few posts done on this thing. Feel free to point them out so I can fix them for next time!

Second, I recently received my Classic Battletech Introductory Box set, and all I can say is wow. Intro rules and expanded rules, sturdy cardboard maps, a full book of fluff and literally handfuls of beautiful plastic miniatures! What a deal! Not to mention that the game is quickly growing on me, haha.

Of course, I will warn any prospective buyers : the introductory box set comes with everything you need to play basic mech on mech battles, with many rules (enough to overwhelm you at first, I can say for a fact), but it doesn't have the full rules. Those will run you a considerable additional cost, as will the tech manual (for making up your own mech builds), the advanced rule expansions for hostile environments, planetary landings, space combat, etc, and many books of fluff and technology on the various eras of the Battletech universe. Plus any additional mechs, infantry, vehicles, maps and whatever else you don't want to scratch build. 

What I'm saying is, the intro set is fantastic, but it has a strong potential to be a gateway drug to a whole lot more purchases and depth. However, with its breadth of content, it should easily keep you busy until you've saved up your allowance to pickup some supplements and introduced some friends to the game so you can spread the load. ;)

All that being said, here is a quicky battle report of my second test of the rules, played solo. The first was the very basic introductory scenario using the simplified rules, and I was too busy keeping up to grab my phone and jot anything down on Google docs/take pictures like I did this time.

Here goes :

"

Trainee Aaron of the KRC (Karkand Recon Corps) in a CP-10Z Cyclops mech prepares to face his first round of testing, pitted against two fellow warriors in unpainted mechs fresh from the assembly line. His gunnery skill is above average and his piloting is slightly sub standard, per random rolls. (The game includes rules for rolling the two major stats for your mechwarriors, piloting and gunnery. It just so happens I rolled a fairly balanced spread, one below average in piloting and one above in gunnery)


The lighter mechs close in to get past the treeline, which he is using to negate their range advantages. (Thick enough tree cover prevents vision and attack altogether, while even a few will make hitting you harder for the enemy - against two quick mechs with long range weapons, pulling them in to brawl with my monster of an Autocannon seemed like a safer bet than letting them run around and kite me until they were out of ammo)


In the ensuing fight, the cyclops loses some armour, but it's Autocannon crushes the chest of the vindicator, damaging its gyro. (The light mechs pressed through the woods on either side of my cyclops and started ablating my defenses - armour is worn down by attacks to access the more sensitive equipment inside - but I turned out to be right about the deadly combo of Autocannon 20, 3 gunnery, and close range)


Aaron closes to destroy the vindicator while its parter rushes to flank him.


The vindicator takes another centre torso Autocannon hit and collapses, out of the fight.


The vindicator collapses alongside the torso-twisted cyclops that shattered its body. (He had tried to run past me to get out of the arc of fire of my Autocannon,  mounted in my torso. Turns out I can twist at the waist and hit him anyway!)


Shortly thereafter, the AC20 claims it's second victim, with critical damage to the engines of the Whitworth,  which by then had lost both arms, knocking it out of the fight as well.

Aaron’s mech was well-worn after the training session, but he had passed. It was time to report for more rigorous training, leading a Lance (like an armoured troop, only the tanks walk),  and get some paint on his mechs. Mercenaries earn no money in training after all."

That's all for now, thanks for checking in, and see you next time!

CMFI - Canadians meet Italians in Castelleti Pass - Final

The situation in Castelleti Pass after 12 minutes.


Canadian Command and Control is being degraded, the Key Terrain is universally in Italian hands, and support fire is still not coming in. The right flank is rapidly collapsing, and the Sherman will be in great danger soon. The centre is holding, but that's the best that can be said. Contact is rapidly heating up around the Villa, and two sections seem to have already been effectively exterminated.

But there's still a chance, if we can fool the Italians into thinking they're still worse off than we are...

The Sherman, with rapid movement and accurate fire, will be key to this strategy - it is the sole unit we have that can reliably take on one or more armoured car with a fair chance of not only surviving but eliminating them, if it can be used intelligently.

At this point, with computer troubles galore (my excuse for the huge amount of time it took to finally post this) the game appears to have died the death. As far as this battle went, I'd say I had a decent chance of still winning, but only based on the point value I was surely netting from destroying vehicles in exchange for my troop losses. While the ahistorical troop choices mean this was a oddball, it was still fun, if mostly for the scrambling I had to do to readapt in the face of overwhelming Italian steel. Good game again, and until next time!

Friday, 24 June 2016

CMFI - Canadians meet Italians in Castelleti Pass - Part 4

The situation for the Canadian Recce Squadron is looking dire. Italians swarm over the hills and through the woods.

The situation at the start of the 9th minute of combat... (oriented for our troops, so North is at the bottom again) note the swarms of Italians near KT 2 and 3, some pushing through the woods of KT 4, and one scouting around the far side of the Villa in the East.


The fascists swarm through the gap between Orchard and Hill, passing the bodies and burning hulks of their first casualties


2Lt Speller, 2IC 1 Troop, and his section are surprised by more Bredas suddenly surging into KT 4.


A new challenger appears... directly ahead of our Sherman, which is busy mercilessly riddling a nearby Breda with its coax. The Obice da assault gun fires once, and hits a tree, drawing Cpl Cenette's attention.


Cpl Epp's Section dismount to sneak up on a Breda by the light of a brewed allied car.


A (fortunately) already dismounted Universal Carrier is pummeled by a Breda's 20mm autocannon, adding to the din and smoke filling the valley.


Pte Smithson, thinking he is the last living man in his section by the Villa, drops his weapon in the hopes that the rampaging Italians see it and spare him.

The Canadians' situation is looking grim at the moment, but as they dig in to what positions they have, they continue to bleed the Italians. The engagement is still up in the air, but it is certain that the snow will be red by the light of day.

Monday, 2 May 2016

CMFI - Canadians meet Italians in Castelleti Pass Part 3

The Breda claims first blood...

...knocking out 3rd Vehicle/1 Section/1 Troop, and killing all but the Commander, Corporal Monger.

Our withdrawal from enemy line of sight was not as planned. Given the enemy's armament (a 20mm cannon) versus the machine guns on our own armoured cars, I maintain that it was a solid decision. That said, I had hoped it had seen none of us at all, and everyone would get to defilade safely. Fortunately, Monger's crew's sacrifice made time for all other vehicles to get to safety.

Capt Mason and his section crawl to safety, safe from the Breda's limited vision.

Sound contacts approach the hill - likely vehicular. Our barrage on the orchards may be a bit late. It will be adjusted to cut off their advance if possible.

View from 4vic/1 Section/3 Troop, at the tail end of the traffic jam blocking the road in the valley - concentrating several troops along one road in the snow may have delayed our getting to position significantly.


A second Breda coming from the same direction as the first hits a second armoured car from 1 Troop / 1 Section multiple times...


...but on discovering his crew is still alive, Sgt Mock orders return fire on the Breda. As predicted, the .30 cal has little effect on the enemy car.


Now that it is evident that they have been seen, Sgt McWhite of 1 Troop orders his car to fire as well; the ridge is lit by gunfire from all directions.


As his troop's cars are brewed up one by one by the Italian 20mm cannons, Lt Anders, HQ 1 Troop, lets rip a burst of machine gun fire in frustration. The sound of more firing down by Castelleti hill drifts up to their ears as well...


The situation, with 5 minutes of the battle down and one minute of near continuous firing behind us.


It is clear by now that the Italian armoured cars outmatch our Scout Cars in a significant way. While penetrations are recorded by .30cal fire against Bredas all down the line, they show no apparent effect, whereas the 20mm shells are punching thumb-sized holes in cars, obliterating crewmen, and brewing up fuel and ammunition across the board. 1 and 2 troop are in contact, and for their losses (4 cars between them) they show not a single Italian car stopped. The Sherman cannot get into position quick enough. 

Our immediate objective is to dismount and spread out - hopefully we can mitigate casualties as the armoured cars pushing past the hill get stuck into the traffic jam in the valley. The artillery, scheduled to come in soon, will also need to be adjusted back, to run across the objectives rather than the orchards - the enemy has outrun all our expectations. Our halftracks in 4 Troop, loaded up so there's infantry on the .50cal, may have a better chance - though they run the risk of losing the whole infantry section if hit... Additionally, various units in the traffic jam - mainly HQ sections - will be retrieving the 2-inch mortars and PIATs from their trunks and preparing to defend the valley.

Hoo boy, this is gonna be a rough one...

1 Section, 3 Troop, flees their burning vehicle. Their commander, Cpl Alarie, is wounded and out of commission. Note the pillars of smoke all the way up the ridge, and the Breda coming under fire as it attempts to crest just to the West of the Hill (KT 2).

Our dismounts wreak bloody vengeance for our losses on the first Italian armoured car to break through near the Hill.

Cpl Cenette pulls his Sherman into position overlooking the Orchard, and within moments kills his first Breda. The Cavalry has arrived! Now to keep it safe as the Italians realize its existence...


Thursday, 21 April 2016

CMFI - Canadians meet Italians in Castelleti Pass Part 2

In the first minute, our forces began deploying to their assigned positions. No boggings yet, knock on wood, but the snow and deployment positions caused a bit of confusion and a slow start.

3 Section moves in file towards their position at the foot of the Villa

Capt Mason, Sqn 2IC, is first to come within sight of the Orchard on the ridge.


4 Section, 4 Troop, first to arrive at the foot of the Villa, tush to take up positions.

Capt Mason, dismounted, hears something in the treeline just over the ridge...

Which resolves into a Breda Italian Armoured Car!
Given that the Breda entered from the North-West, it's clear I need to reevaluate my plan before moving on.

An overview of the situation 3 minutes in - once again, North is down.

My METT-TC stands, except for a few elements of the Terrain - namely, my Avenues of Approach.

Key Terrain (reiterated for clarity) : KT 1 remains villa, KT 2 Hill, KT 3 Orchards, KT 4 the ridge, KT 5 the South-West hill.

AoAs (reevaluated) : I now estimate the Italians have entered the AO (Area of Operations) from the West, rather than the South. This leads me to believe their AoAs vary significantly from my inital estimates. Therefore, I maintain that my major AoAs are AoA Valley and AoA Ridge, as before, but AoA Valley may extend past KT 1 for a flanking maneuver. Meanwhile, Italian AoAs are now AoA E-Ridge (Enemy Ridge) and AoA Orchards. AoA E-Ridge is currently patrolled by the dismounted scouts from 1 Troop, who have not seen or heard anything, meaning the enemy is likely approaching largely from the orchards in the valley.

What does this mean?

The Italians approaching from the orchards in the valley means that
1) My planned location for the Sherman V at KT 4 is now threatened - I don't want it knife-fighting in an elevator with Italian Armoured Cars and infantry, I want it as an effective, high-impact force multiplier capable of eliminating enemies from range and maneuvering behind our other elements. I will likely shift it towards Capt Mason's position on the ridge, where it could stay hull-down and watch for more vehicles coming from KT 4 or the Breda's current approach.
2) KT 5 remains easier to get to for the Italians - in fact, they may already be on it. I should be wary of exposing too many troops on the ridgeline.
3) The villa is further from the enemy than I thought - it may be advantageous for 4 Troop to occupy it immediately, and fortify against the enemy, as it will give impressive overwatch over the valleys if it's not being contested from up-close immediately as expected.
4) The enemy will be passing through the two orchards immediately, and en masse. A mortar barrage on the TRP in the Eastern orchard will be ordered post-haste to hit troops moving on the villa while 4 Troop sets up.
5) It may be wise to pull back from the Orchard and let them build into a salient there - fire from the villa and our Sherman V as it repositions may kill the rest of the Breda's platoon if it is just the pointman, as it appears to have not seen us coming yet - they may also be under some misunderstanding as to where we entered the valley in relation to them, and so may not have been paying any attention to where Capt Mason and the Squadron HQ just popped up with 1 Troop.

Here is an annotated map, with a few of my notes marked.

Colours changed from last time to make them more in line with convention - though I still need to find the right colour for objectives (it's not green) - font changed because I couldn't remember the old one.

Stay tuned for the next installment, where we will rotate our plans wildly, and the first shots will be fired in anger in Castelleti Pass...

Sunday, 17 April 2016

CMFI - Canadians meet Italians in Castelleti Pass

Hello, and welcome back to the Dark Ages for our second Combat Mission battle! This one will occur in September of 1943, between the Canadian Army and Italian Army, over a small Italian pass. It is dawn, and there is light snow falling and gathering on the ground. Here is my mission analysis :

MISSION

Canadian Forces are to move forward and seize Castelleti Pass to enable future forward movement of the Canadian Corps.

ENEMY

The enemy will be an unknown size force of the Italian Army, likely moving in to secure Castelleti Pass against Canadian advance.

TROOPS

1 Recce Squadron (+), augmented with Sniper Teams for each troop, designated TRPs (Target Reference Points), and fire support from off-map provided by a medium mortar battery and a destroyer just off the coast. 1 Troop (-) has also traded its 3rd section for a Sherman V, for some additional firepower.

TERRAIN

The terrain we will be fighting on - The North edge is down

Observation - The map is strongly broken up by the ridgeline the orchard sits atop, and the hill Castelleti Villa rests on. Observation from these points will be largely unobstructed, though the South end of the valley, from which the Italians will approach, is fairly well-wooded. In the South-west of the map, a large hill is located right next to the Italian deployment. This will provide them good observation opportunities if occupied. No visibility will be afforded from our starting positions.


Cover and Concealment - The orchard, villa and hill each have relatively good cover and concealment, though the orchard is the least covered. The South of the valley is heavily wooded and has a few orchards leading right up to the ridgeline. These provide the Italians good covered approaches to the objectives. It is also worth noting that the time of day and falling snow may impede spotting, though I don't know to what extent.


Obstacles - The terrain offers no major obstacles to movement, though the varying altitudes and hilly terrain will make movement more difficult for armoured vehicles. No positions appear impassable. The tight, wooded/built-up nature of the objectives makes them optimal for infantry occupation.


Key Terrain - I identify the three objectives, Villa, hill and orchard as KT 1, 2, and 3, for their objective value and their value as observation and fire support positions across the valley. The extension of the ridge to the West is KT 4, for its position overlooking and enfilading the orchards along the Italian approach, and its ability to cover the hill in their deployment. The hill to the South-West in the Italian deployment is KT 5, and is of particular risk as we will likely not be able to occupy it, but rather will have to control it by fire.


Avenues of Approach - Our main avenues of approach are via the valley floor (AoA Valley) and along the ridge (AoA Ridge). The valley floor will be quickest and give easier access to KT 1 and 2, while the ridge offers more tactical superiority and easier access to KT 3 though the time it takes to scale it may give the Italians time to cover it. The likely Italian AoAs are the slope to the South of the Villa (AoA Slope), or one of the two orchards on their valley floor (AoA East and AoA West).

The Map, annotated in accordance with my Terrain analysis


TIME

1hr30 mins

CIVILIAN CONSIDERATIONS

nil

DEPLOYMENT AND SCHEME OF MANEUVER

TRPs are designated on all determined Italian AoAs, as well as on the Villa and KT 5, to suppress enemy fire positions there if necessary. Strongpoints will be the Orchard and the Hill, with the option of falling back out of the villa if under pressure and reducing attacking Italian forces with precise fire from the destroyer or mortars before counter attack. The Hill, KT 2, is key to covering the dip in the valley located between it and KT 3 and avoiding Italians slipping straight through our centre.

4 Troop, the assault troop of rifles and M5 halftracks, will stand in reserve just behind KT 1 and 2 for this purpose. 

1 Troop, with the Sherman V, will move aggressively to KT 4 and set up the Sherman in a hull-down position to observe enemy AoAs, holding fire and maintaining concealment until enfilading fire will have the best effect. It will be backed up by 2 Section's dismounted scouts, while HQ and 1 Section's armoured cars push to the Orchard.

2 Troop will push to KT 2, dismounting 2 and 3 sections to occupy the woods on the hill and establish observation, with elements of 1 Section's armoured cars covering the low ground from the rear.

3 Troop will move to the Villa, with 1 Section covering the flanks while 2 Section occupies the buildings and 3 and HQ sections standby to follow up on anticipated 4 Troop counter-attack.

Snipers will operate alongside their Troop's advance, establishing vision over enemy AoAs and engaging where possible.

Forward Observer of the Squadron will head towards the orchard and standby to direct fire on the TRPs as required.

Tune in next time to see how the first few minutes of the action pan out!

Wednesday, 13 April 2016

CMRT - German Armoured Reconnaissance Part 2

Hello again, and welcome back to the Dark Ages!

Time to resume the tale of our Armoured Reconnaissance Battalion, establishing control over an MSR leading ever deeper into German territory, to give time for their Corps to withdraw.

To recap, here's my annotated map from the briefing :


We currently hold KT 1, 2, and 4, with some enemy contacts spotted in among the trees in KT 3 but no positive contact established. The same is not true of KT 1, where Soldat Reinhardt, in our Tiger, has eliminated 3 (!) T-34s before repositioning, and his dismounted Panzerjager team bagged an SU-76 from a covered position within the Western wood. This leaves one T-34 near KT 1, and sound contacts near the other AoAs...

Kruger of the Panzerjager team orders his fireteam partner to fire, but this particular projectile misses. The T-34 buttons up, however, and begins pressing into the underbrush, searching for either the infantry or the Tiger. One of our armoured cars on the ridge now spots an enemy T-34 and suppresses it with its 20mm autocannon (though this won't do much damage against a proper tank...) Meanwhile, a Russian SU-85 pokes its head out of that wood, likely hoping to establish a line of fire along AoA Centre...


And is swiftly taught a lesson in getting to a firing position first by our King Tiger. That circle near the top of its hull is the exit point of the shell currently blasting a hole through its gun mantlet. Score another for massive German armour weapons!


Reinhardt, having fallen back while repositioning,  now spots yet another future kill coming up along the Southernmost edge of AoA North. It lasts about as long as you may expect by now...

An update to our positions, for your Situational Awareness :


You can see our Heavy Armoured cars in KT 2, the Armoured Car Section in KT 4, positioning to ambush anything that comes near the crossroads, and 2 Section along the ridge in the Southern field. The T-34 in the North field is within Reinhardt's sights from his position on the edge of the South field (the tank symbol near the centre of the picture), the one in the centre is under suppression fire from 2 Section, and the one crossing the woods in KT 1, where the Tank hunter team is frantically crawling away - their Panzerfausts expended - is Reinhardt's crew's next target.

At this point, our dismounted reconnaissance troops begin pushing forward, in order to probe whether there will be any more to the Soviet assault, or if they are on the back foot. Once we've set them off balance, I intend to counter attack decisively and break their formation thoroughly. Of course, while they are content throwing themselves on our guns, I am content to let them continue... :D


Our brave dismounted reconnaissance elements bound forward through the woods to the North of the MSR. In the distance, you can see mortars impacting Key Terrain 3 to suppress enemy positions there.

Observing the situation as Reinhardt rotates to engage the central T-34s who have now begun pushing through the woods in KT 4 to support their isolated brother in the South, the Majorgeneral decides that the counter attack will occur in the Northern AoA. This is because :

1) The covered approach offered by the treeline on the North of the MSR leads directly to the dip in the ground, which may offer yet more cover.

2) Our dismounted reconnaissance can follow along by bounding from woods to farmhouses, and hopefully discover and engage enemy infantry before they engage our armour.

3) Bounding armoured cars followed by the Tiger will have long fields of fire to cover each other along, rather than cutting through successive treelines into an open area as would be required in the South.

Unfortunately, while HQ was pondering, we suffered our first (and only - spoiler alert) armoured loss of the day.


One of the T-34s survived to cut through the woods and engage the Armoured Car Section HQ car just outside of KT 4. 2 crewmen, including Oberfeldwebel Schilling's second, are killed, while Schilling and his driver run for cover. The T-34 and its two surviving friends, however, are swiftly dispatched by our Tiger and King Tiger in retribution. Matters briefly get tense as one of the T-34s survives a shot from the Tiger (!), likely having been overpenetrated by the beast of a gun at such a short range, and fires a shot at another armoured car. Luckily for the Fatherland, the shot misses, and the T-34 is disabled with the next shot. At this point, the Soviet attack is on its last legs. As I align Reinhardt with the Armoured Cars to the North to begin pushing forward in out own counter attack, the Heavy Armoured Cars engage and destroy two T-34s maneuvering at the far side of the Northern AoA. They fired wildly on the move, but in their panic, did nothing but anger the local ents (their shots hit trees in the forests near the center of the map).

At this point, the battle was largely decided. Soviet infantry were seen running forward as we began to push along the South edge of the Northern AoA, as per our Course of Action outlined above, but as it happened, they were just bringing a request for ceasefire from the beleaguered Soviet commander.

The situation at the end - The rightmost plume of smoke is joint between our armoured car and its assailant. On the MSR, at the left of the image, smoke drifts from the last T-34, after an HE round hits it from one of our Heavy Armoured Cars intending to scatter its crew. Reinhardt, at the centre, still unbuttoned (he did not close his hatches once!) bounds forward to the central farm complex, where one armoured car watches for enemies to the front or in the farm.

The battle was short (12 mins in-game!) and bloody (my brother had lost all his armour and a few of his infantry by the end). AAR points for this from my end include :

Experienced German armour is worth far more than its weight in gold. Reinhardt alone bagged near enough to half of the enemy armoured company, all from largely the same position in the Southern AoA.

Good positioning wins the day. For one reason or another, I managed to occupy all Key Terrain I had identified as essential to controlling all 3 AoAs very early on. This meant that, first off, a whole section of tanks was destroyed before the Soviets knew what hit them in the South, and second, that the Soviet SPG, potentially a threat in the right position, was able to be eliminated by our King Tiger quite comfortably when it moved late into the Central AoA. Overwatch on all three major areas was key to our success.

This map was neatly divided and largely open, chosen based on a thumbnail and my brother's mention of a "Kursk" theme. It didn't quite lead to a large battle, and wasn't conducive to much maneuver - positioning at the start largely dictated the winner. On other terrain his numbers may have been able to spread out more and exploit the fact that most of my force was very lightly armed and armoured.

From my point of view, AAR points for the Soviets include :

The decision to cut through the woods partway through the battle was unexpected, and may have been the most decisive action of the combat, had it been done with more force. This kind of non-linear thinking may have allowed the Soviets to severely hamper my forces, or even defeat them, had they not already been largely crippled within the first 5 minutes of fighting by losing an entire arm of their attack.

The Soviets should have selected effective firing positions and occupied them immediately, or else focused their large numbers in one location for a breakthrough. Separating their forces at the start makes sense for probing all areas of the defense, but staggering losses in all locations meant that they were unable to re-coalesce for combat, and delayed movement (or something) at the start meant they were caught in the open when they tried to move forward.

Better use of their (seemingly numerous) infantry resources, which appear to have been kept in reserve for most of the battle, for reconnaissance or screening of their armour, may have allowed the Soviets more flexibility as well as more intelligence about my positions. If he intended a slower deployment of his armour, accompanying their advance with infantry would have provided more targets for me at the very least.

All in all, as I said, it was a fairly one-sided affair, but I hope it provides an interesting look into the Combat Mission games. Once my computer is up and running again, we intend to get another game going, and it's my intention to document it much like I did this one, potentially posting each round in more detail as the game progresses.

Farewell for now!


Tuesday, 12 April 2016

CMRT - German Armoured Reconnaissance - Part 1

Hello again, and welcome back to the Dark Ages!

Today, I'm trying out something new by introducing one of my other hobbies to the blog, and that is wargaming. In this case, computer war-gaming, using the fantastic strategic simulation series Combat Mission (Red Thunder module specifically, in this case). The battle I am showcasing is a bit of a one-sided affair, unfortunately, but they are not all like that, and if I keep up the regular e-mail games like I want to, as well as potentially some single-player action on occasion, I should be able to showcase fairly varied conflicts in the future. For now, a game between myself and my brother, I playing the Germans and he the Soviets.

SITUATION

The Germans are on the run from the Soviet steamroller. Somewhere in Eastern Europe, a reinforced Mechanized Reconnaissance unit of the Wehrmacht takes up position along an MSR (Main Supply Route) running East-West between two small farm compounds. They are closely pursued by Soviet armour, estimated to number approximately a company.

MISSION

Erste Panzer Aufklärung Battalion, under Generalmajor (If I'm interpreting Combat Mission's rank indication for my Battalion HQ correctly - though it seems a bit high of a rank for the situation!) Wünsche, is to seize and hold the farm complexes along route Bauer against Soviet attacks, in order to facilitate retreat of the Army Group deeper into Eastern Europe.

ENEMY

Enemy is estimated to be company-strength, heavily reliant on armour, though it will likely be large numbers of lower-grade soviet tanks. (It seems my brother wanted a massive tank battle, and not just an Eastern Front battle with tanks, as I understood it. This led to the significant quality difference in our forces. Oops. :S)

TROOPS

The Germans have a Reconnaissance Battalion of armoured cars, mostly with 20mm cannons, but some with heavier anti-tank armament. These have been reinforced by one Panzer VIE Tiger, and one Panzer VIB King Tiger, to lend them significant punch if proper lines of fire are established. Additionally, directly under HQ are a few dismounted scouts and tank hunters with panzerfaust disposable weapons and panzerschreck AT launchers, which will be best able to exploit terrain features as necessary.

TERRAIN

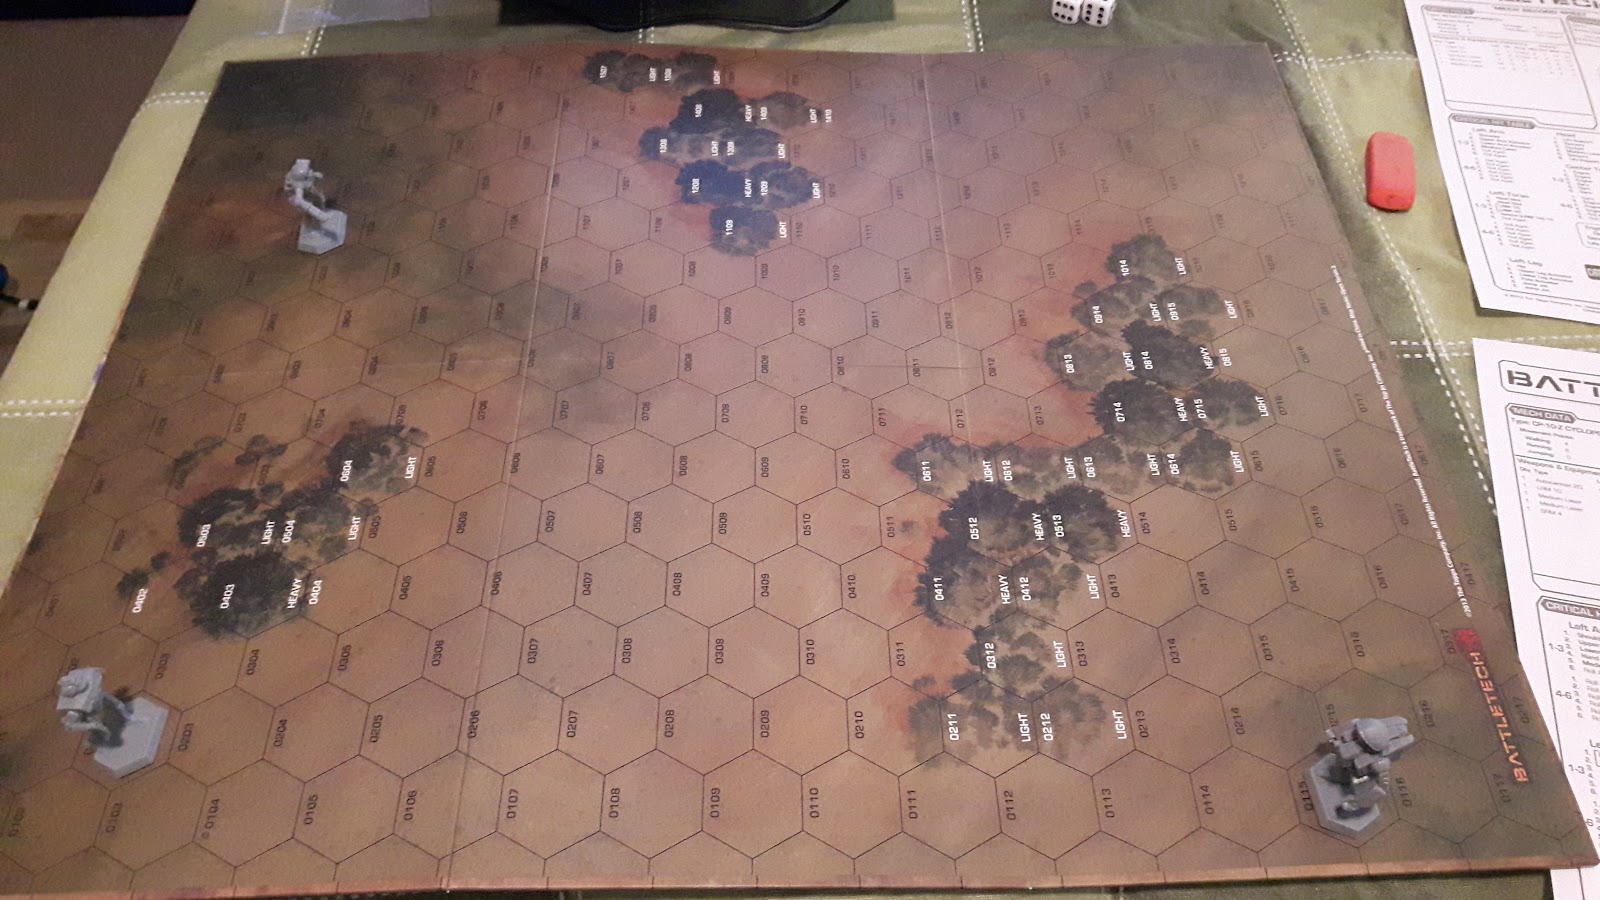
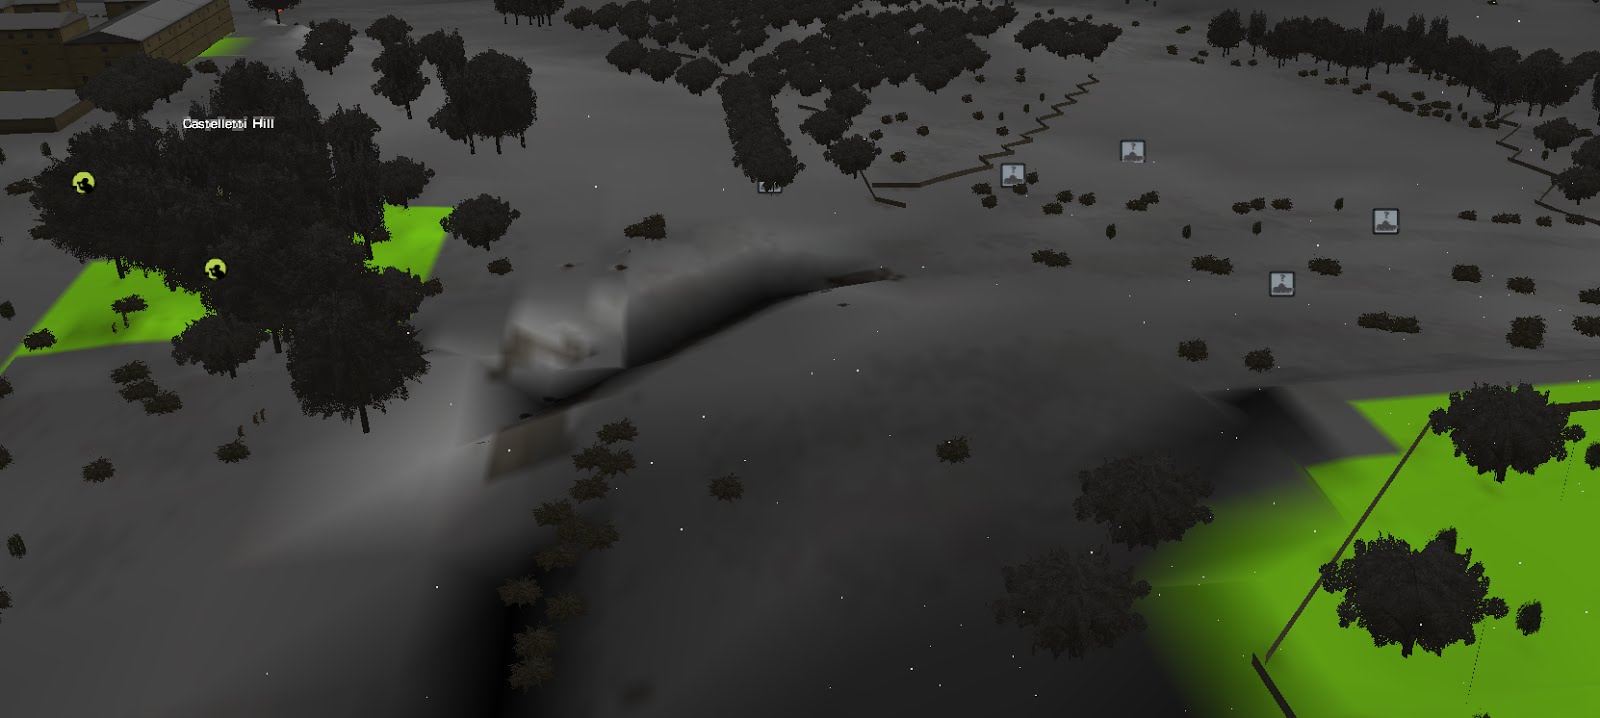
Here is the map we were working on (oriented from my deployment, at the bottom - North is left):


Now for a detailed analysis.

Observation - Right off the bat, the MSR is a long engagement area, broken up by a few rolls in the ground. It would be an optimal place for me to command as soon as possible. Similarly, the field in the North, bordered on both East and West side by treelines, is a long field of fire with a significant dip in the middle. Observation on it will be required, but troops will likely be able to maneuver in defilade if they move in quickly enough to be below the lip of the depression before my armoured cars push through the trees to watch over it. In the South, the two parallel treelines by the road break up line of sight significantly, and I will want to push at least into the nearest treeline to prevent the wide fields of fire across the farmland to the South from being dominated by the Soviets. That being said, its lines of fire to the East will be short, cut off by the next trees - here's hoping Soviet infantry with AT equipment aren't crawling in those by the time I get there!

Cover and Concealment - Of course, the treelines will provide excellent cover and concealment for overwatching fire. However, there is very little concealment or cover for forward movement. The MSR itself, lined on both sides by buildings and trees for much of its length, may provide a concealed avenue if it can be controlled, but enemy forces concealed to either side could inflict a lot of damage in an ambush. Worth noting as well are the dip in the North field and a low ridge in the South field, which may give my scouts just a bit of extra elevation, as well as somewhere to reverse behind and go gun-down if they come under fire.

Obstacles - No significant obstacles. The farmhouses are not very numerous and don't impede maneuvering much. The forests could slow vehicular movement, and we are very low on infantry to counteract that.

Key Terrain - The treelines to North and South, dividing us from the Soviet axis of advance, are Key Terrain, as they will dominate the flanks of any approach on the MSR, and will provide optimal control over both their fields and the centre. The chokepoint on the MSR at the crossroads is also Key Terrain, as it sits in a small depression and is surrounded by trees - vehicles, supported by infantry, that move in there will be able to deliver fire and disappear in any or all directions as needed.

Avenues of Approach - I identify 3 main avenues of approach : AoA North, across the Northern field, AoA Centre, down the MSR, and AoA South, across the Southern field. Notable is the fact that AoA South is open for me, but the treelines are nearest the Soviet approach. We will have to seize the treeline quickly or else lose control of that AoA immediately.

Here is an annotated map, for visualizing my analysis :


TIME

There is 1 hr and 30 min allocated to this operation, though likely, based on formation sizes, time will not be a major factor.

SCHEME OF MANOEUVRE

I intend to allocate my troops to Key Terrains 1 and 2 in particular, with the King Tiger maintaining control of Route Bauer, in order to establish control of the 3 AoAs. I expect the Soviets will mount an attack to seize those features as well. When that attack is repelled, we will mount a counter-attack along whatever route seems most advantageous, based on what we can establish of enemy dispositions after their attack.

Okay, with all of the planning out of the way, now for....

EXECUTION

The first minute of the battle is fairly uneventful, with my troops moving to their assigned positions. The Heavy Armoured Cars and Support Platoon to KT 2, 2 Section and Soldat (!? I'm really not sure about these rank insignia...) Reinhardt in the Tiger to KT 1, Soldat Pälke in the King Tiger to a small ridge to observe KT 4 from a hull-down position, and HQ to the centre with the Armoured Car Platoon pushing forward to get into KT 4 if possible, and report on enemy positions if not. The dismounts are, well, mounted, riding our tanks to take up positions in the woods near KT 1 and 4 - I don't estimate hand-held weapons will help much across AoA North, but they could be invaluable in the short spaces along the MSR and in KT 1.

Here's a flavour shot of our King Tiger and its eager riders!


Within the next minute, Palke is in position, the infantry dismount, and the armoured cars begin setting up observation wherever they are able to break through the trees. As we begin setting up, we make our first contact with the enemy :


Two T-34s are spotted, one after the other, at the far end of the MSR. Credit for this image goes to Obergefreiter Knappe, who snapped it from the back of the advancing King Tiger! The King Tiger then repositions slightly to watch the road more effectively. All teams then come to report good positioning in their Key Terrain. So far, a success.

Reinhardt, however, is not content with observing from his Tiger. Shortly after he dismounts his Tank hunters, he spots a T-34 coming through the opening in the woods ahead of him. One shot from the 88mm dispatches it fairly quickly, and he turns to congratulate his gunner, when... another T-34, then a third, come along the same route! Of course, Reinhardt has his eye on an Iron Cross today...


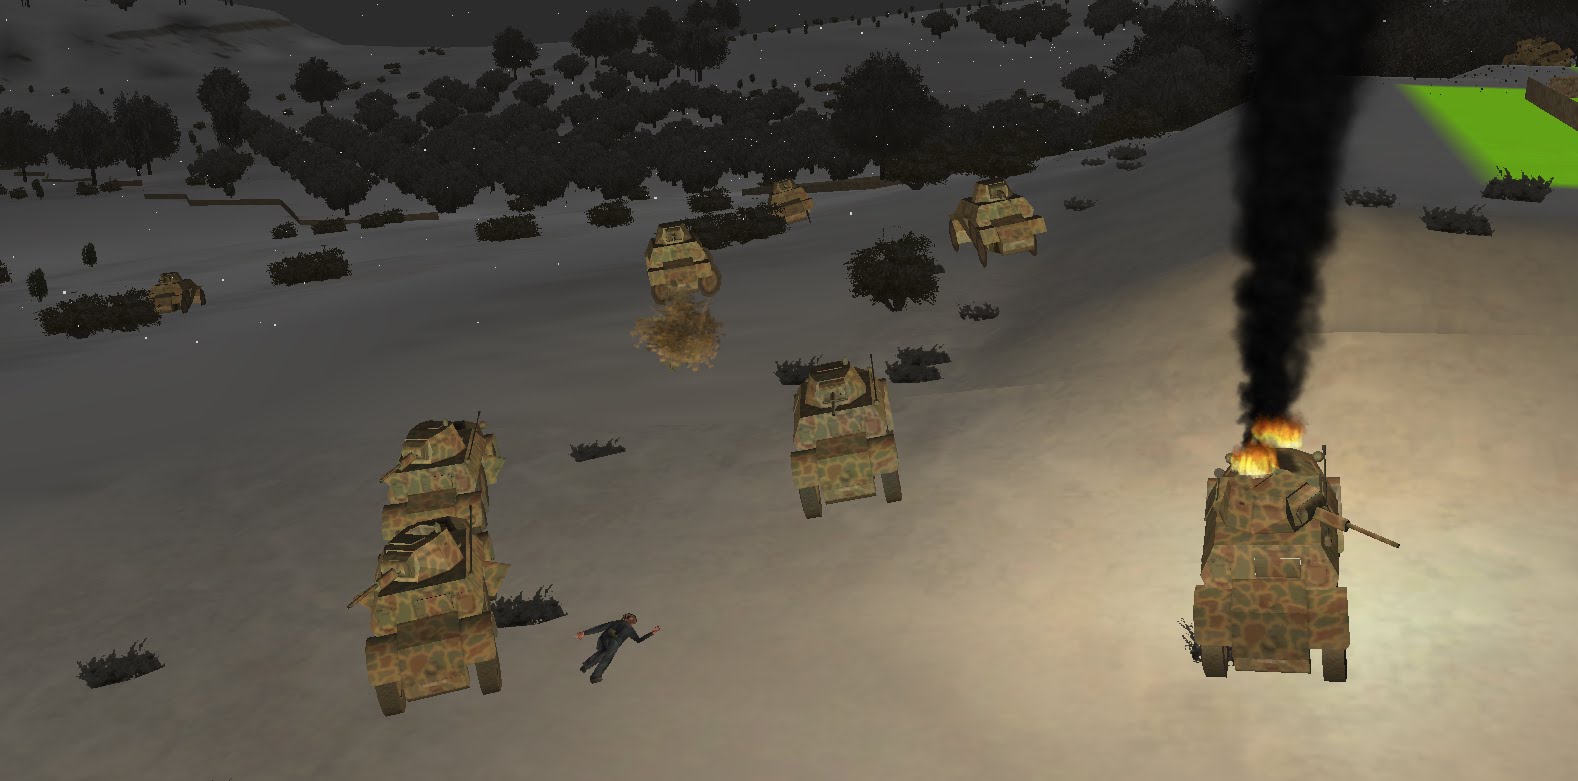
That's one T-34 burning in the background, a second (the lead) knocked out - you can just see the driver laying down to take cover ahead of it - and the third about to receive a warm German greeting on behalf of Reinhardt's crew. With elation in his voice, he reports a squadron of T-34s out of commission in the South. A good start! Cautiously, Reinhardt begins repositioning, pulling out behind the woods before his position can be engaged by any additional potential enemies. Those potential enemies, of course, oblige by immediately rushing into the opening, just as Reinhardt loses the ability to engage them. (Good Soviet tactics...)

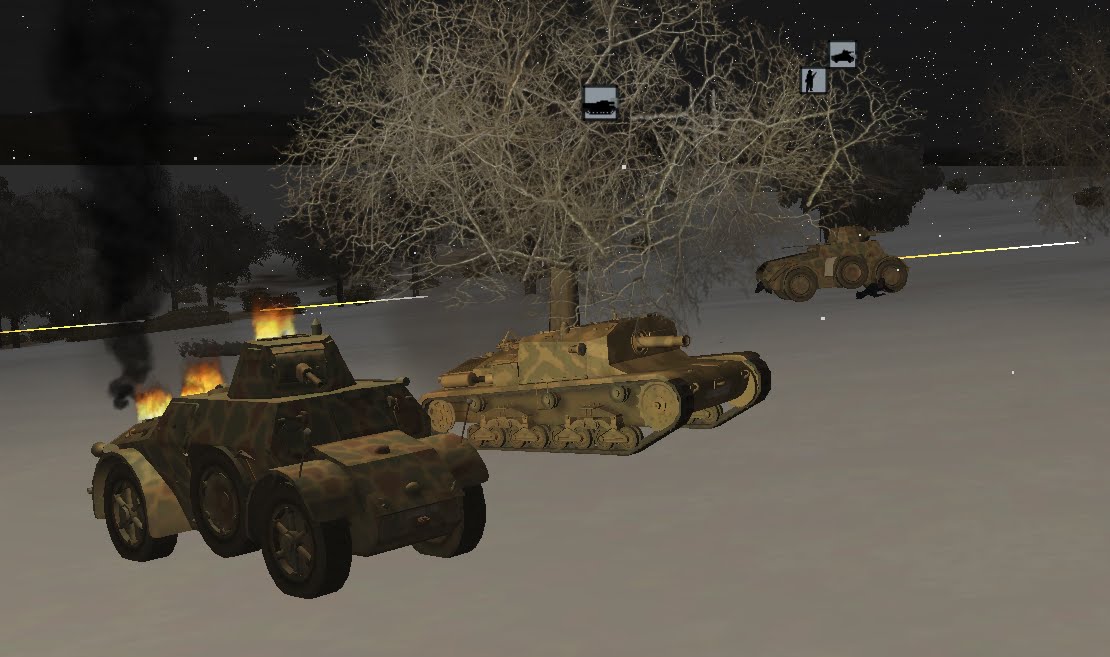
An SU-76 self propelled gun and a T-34 pull up to the woods, halting just short to hunt for a Tiger that is fortunately now out of sight behind the trees (though, to be fair, I would not have favoured their odds against the front of the Tiger in any case. Of course, we didn't let those Panzer hunters ride a Tiger all the way to the front just because their legs were tired.


(The beige spot between the trees ahead of the Tank Hunters is the Panzerfaust's shaped charge in flight - spoiler alert, it connects)

With the SPG destroyed, Kruger (the Tank Hunter team leader) and his fireteam partner are ordered to try engaging the T-34 just to their front. All others hold their breath, as more vehicles are heard approaching to the North. My estimate now of a company of armour seems bang on, with their likely disposition being 3 North, 3 Centre, and 3 South, with HQ tanks and their augmentations of SPGs as the unknown agent that could pop up at any location.


Well, I need to head out and finish up my evening, so stay tuned for Part 2, in which the Soviet attack begins in earnest, and the Germans prepare for their own counterattack!